
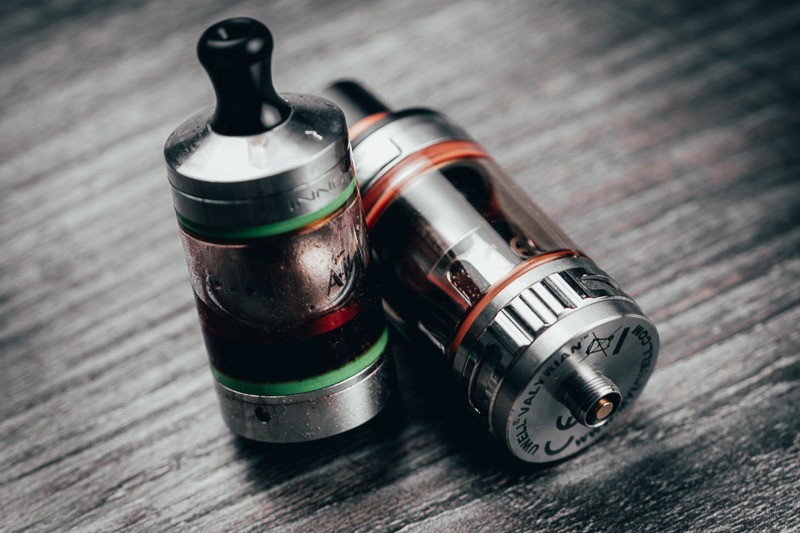
Have you ordered Vapefly Brunhilde? You never know what this atomizer’s logistics process was like before it went into the box. Machine oil remnants are often found, so clean it before you start using it. If you already have a pre-installed coil head, remove it as we don’t want to wet the cotton and ruin the coil.
Each model has a different way of disassembling, in doubt we suggest you look on Youtube and watch some videos. If any part of the atomizer is stuck, we have several good tips in this article so you don’t risk damaging your atomizer.
Disassemble the entire part and clean with running water and mild soap. I like to use an old toothbrush to gently brush the atomizer and remove any subject from the corners and crevices.
You can increase the effectiveness of cleaning against germs and bacteria by using boiled hot water and cheap isopropyl alcohol, cereal alcohol or vodka. Be careful when using hot water as if there is a heat shock with icy parts, it may melt some rubber or crack a glass. When in doubt, mild soap and water will do.
Once it’s clean and dry, it’s time to reassemble, but before closing we need to prime the coil. Soak the coil head cotton with a little juice to prevent it from being able to pull the liquid to be properly saturated and burning, which is quite common in the hand of novices who forget this detail. and already spoil your coils on first use.
Apply a few drops directly into the coil head and inner cotton until it is saturated, but do not overdo it.
This process is for any coil head and should only be done once before the first use of the resistance.
Pay attention to the type of coil head you are installing. Several atomizers available at Vapeciga today offer different models, with wire types. Each wire has its characteristics and some should be used in specific modes, we will need to know the type of coil head to later configure the mod.
The time to turn on and set up the device
After preparing the atomizer and threading it in the mod, it is time to turn on the device and set it up correctly.
Virtually every device turns on by pressing the quick release button for 5x.
Each company uses a different chip model, so you will need to go to the manufacturer’s website, consult the manual or watch a video on Youtube and follow some analysis to learn how to use your mod. We know that Chinese manuals can be pretty bad, but probably some Youtuber has already made a video with your device and will show its operation in detail.
Some commands are usually universal or at least more common among devices:
- 5 clicks on / 5 clicks off;
- 2, 3 or 4 clicks to enter any type of menu or setup option;
- + Button to increase and – to decrease numbers such as power, temperature, etc;
- Within the menus, + and – make you change options.
Holding down any button combination for a few seconds is often the way to access some functions. Usually the combination of trigger and + button or – button is for locking the device (the trigger button is locked, for storing in the pocket for example and not risking triggering unintentionally), entering stealth mode (device still working but without triggering the LCD screen, becoming more discreet), among other things you should look for in the manual to know how to configure and use.
When it comes to setting up for the use itself we just really need to worry about setting the mode and choosing the power and / or temperature.
All current mods have two modes of use, power and temperature control.
In a brief summary, you can switch between so-called POWER mode and TC mode by taking the following precautions:
POWER Mode – It is the simplest of both modes. It feeds resistance with a certain wattage and thus vaporizes the cotton liquid. In some cases the devices have a pre-heat option which means using a higher power for a short period just for the beginning of the drag because the room temperature coil needs a little higher power to heat up for the first time.
Example 1 without pre-heat: When triggered the mod releases a power of 50W directly to the resistance.
Example 2 with pre-heat: When triggered the mod releases a power of 70W for just 1 second to preheat and then drops to the nominal 50W.
The use of pre-heat depends on whether your appliance allows it, consult the manufacturer’s manual or page to find out if it has and how to use it.
Temperature Control Mode – Stainless steel is the only wire that can be used in both modes. This mode is a bit more complex as it has two settings to determine.
The first is the desired maximum temperature that usually goes from 100o to 350o depending on the device and the wattage you want to use to reach that temperature, which is usually a maximum of 75W, but can also change depending on the device. The higher the power you determine, the faster the temperature will reach the value you set as maximum.
Once the desired temperature is reached, the device will control this temperature, creating pulses that do not allow the value exceeded.
This is good for a few reasons: If we do not exceed a certain temperature, the cotton will not burn. The steam experience is different, so you have to experiment to understand the difference. It is also said that this mode is less likely to be harmful, as there are theories that the metals we use, when they reach very high temperatures, can create harmful compounds.
When activated, the mod releases a power of 50W in the resistance until reaching 200o then it starts to pulse, trying to keep that temperature in equilibrium.